Smart WiFi - Home App

Home App
App Update - April 2025
When will the app upgrade happen? Will it be made available on iOS and Android at the same time?
The Plume Home app will roll out on both iOS and Android starting on April 24, 2025, when the rebranded app will be pushed to our HomePass users.
It will be set for a slow rollout, with just a few customers receiving it over the first day; a small but increasing amount of HomePass users will be upgraded each day (from the HomePass app to the Plume Home app). We expect the entire rollout to take place over the course of a couple of weeks.
Note: During the transitional period following the launch, some of our users will still have the old HomePass app, while the rest will be upgraded to the new Plume Home app. Therefore, the two apps will co-exist during the rollout period.
Will the app upgrade cause me to be logged out of the app?
Will I have to do anything for the upgrade?
Will the HomePass app continue to exist? Will I have two different apps on my phone?
Will all my settings be the same after the upgrade?
What's New on Home App
The Main Menu Bar
Freeze is now Focus
Renaming Device Internet Freeze to Focus is more than just a name change, new functionality has also been introduced.
Now specific apps or categories of apps can be blocked on a schedule instead of blocking all of the Internet.
For example, streaming apps or specific apps can be blocked to stop distractions while working from home.
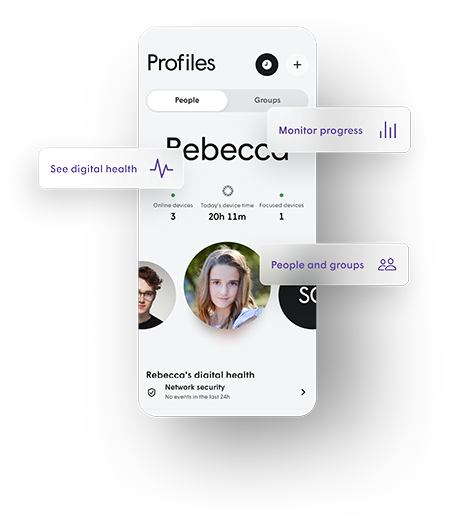
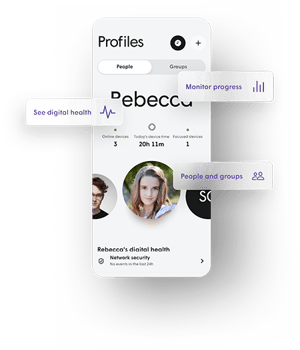
Profiles for People and Groups
Device Time
Where did my feature move?
| Device Time | Profiles Page |
| Focus | Home page & Profil page |
| Network Settings | Settings page under the Network tile |
| Node Management | Network page |
| Password Settings | Network page under Password (WPA3)/Passwords (WPA2) tiles |
| Performance monitoring | Network page under Performance |
| Security (Guard) blocked events | Network page under Security |
| Speed tests | Home page under Activity by tapping on Speed test results |
| Time out devices | Home page & Profiles page |
| Topology view | Network page under Topology |
| Traffic Boost | Home page and Network page |
What has not change
We’ve given the network setup process a visual refresh with updated screens—but don’t worry, the steps you follow are still the same. If you’re looking for a walkthrough, we’ve got a dedicated training module ready to guide you.
Settings That Stay Familiar
Your go-to settings haven’t gone anywhere. Most are still located on the Settings page, while Network, Security, and Privacy settings each have their own dedicated tiles. Need to manage your account? You’ll find those settings in the menu at the top right. And for extra support, the Help & Support section has everything from contact info to legal docs—all in one easy place.
No Surprises (Except for Focus)
All your favorite features are working just as they always have—with the exception of Focus, which now includes enhanced functionality (see above). Everything else? Business as usual.
Account
Where can I download the Home App by Plume?
The Home by Plume app is available for download from the US Apple App Store and the Google Play store.
I can’t download the app, what do I do?
The Plume Home App is compatible with iOS smartphone devices (iOS 15 or higher) and Android smartphone devices (7 or higher). If your device is not compatible with the app, it will not be available for download.
If your device is compatible with the app, here are some steps you can follow to resolve this issue:
- If nothing happens when you try to download the app from the App Store, reset your device by turning it off and on after 2 minutes.
- If your device's OS is not supported by the app, you will be prompted to upgrade your OS. Perform the upgrade and then download the app.
- If you do not have sufficient storage available for the app, you will need to remove or move files and apps stored in your device before you can complete the download.
- For all other issues, consult the App Store or your device's Help Center to get the help you need.
Setting up a Profile
1. Tap the "Profiles" icon at the bottom of the home dashboard.
2. Tap the "+" button at the top-right corner of the Profiles screen.
3. Tap on the placeholder image and follow the instructions to add a Profile image.
4. Select your preference for content filtering (restricted, moderate, light, or none).
5. If inviting a user, tap "Invite to Plume Home app" and set permissions (read-only or full access).
6. Finish setup by tapping "Add" or "Add & invite".
Set up Home, Guest, and Internet-only passwords
1. Access the Network page and tap on the tile with the name of the WiFi network that you want to update.
2. Select which type of password to create from the Home, Guest, or Internet-only options.
3. Enter your password and select the shareable devices. Only selected devices will be able to use and access this password. After completing this step, tap the "Next" button.
4. Enter the new password which needs to be 8-63 characters long.
5. Set a date for the password to expire. "Never" is set by default.
6. Tap "Create" at the bottom of the screen to create the new password.
Where can I see the list of devices connected to my network?
To view a list of connected devices on your home network, click on the Network page at the bottom and tap on the Devices tab.
The device lists are organized by the type of password being used. Ethernet-connected devices will appear in the Home Zone. The device lists show all the devices that are currently connected to your network and those that are disconnected from the network.
The number shown on the banner is the total number of devices that have connected to the network within the last 14 days and/or have been assigned to a profile.
Passwords
How to set up Guest, Home, and Multiple Passwords
1. Access the Network page and tap on the tile with the name of the WiFi network that you want to update.
2. Select which type of password to create from the Home, Guest, or Internet-only options.
3. Enter your password and select the shareable devices. Only selected devices will be able to use and access this password. After completing this step, tap the "Next" button.
4. Enter the new password which needs to be 8-63 characters long.
5. Set a date for the password to expire. "Never" is set by default.
6. Tap "Create" at the bottom of the screen to create the new password.
Enabling Multiple Passwords
Multiple passwords are automatically enabled if your network does not have 6GHz-capable nodes. However, if the network has 6GHZ-capable pods, the network may only have a WPA3 SSID and a WPA2 SSID will need to be enable to use multiple passwords.
1. Open the Settings page. The Settings page is opened by tapping the gear icon in the main menu bar.
2. Open the Network settings page.
3. Open the Wifi security page.
4. Enable WPA2. If WPA3 is available, there will be switches available to enable both the WPA2 and WPA3 networks. Tap the WPA2 switch to enable multiple passwords.
5. Add additional passwords.
Adding new Home Passwords (WPA2)
A WPA2 network must be enabled to add a new Home password. The password created during initial setup is a Home password for both WPA2 and WPA3 networks.
1. Open Network Page. The network page is the third icon in the main menu bar.
2. Open the Passwords page.
3. Select the Home tab.
4. Tap the new password button. Under the tabs should be the Create home password. Tap it.
5. Enter the password.
6. Add the password.
Adding a new Guest Password
A Guest password is used for devices that should connect with some but not all devices with Home access.
1. Open the Network Page.
2. Open the Passwords Page.
3. Select the Home Tab. Tap the Guest tab to select it.
4. Tap the new password button.
5. Name the password.
6. Select devices to share.
7. Tap the Next button to proceed.
8. Enter the password.
9. Select an expiration time.
10. Tap Create.
Adding a new Internet-only Password
A device connecting to an Internet-only password cannot communicate with any other device on the network.
1. Open the Network Page.
2. Open the Passwords page.
3. Select the Home tab.
4. Tap the new password button.
5. Enter the password.
6. Select an expiration time.
7. Add the password.
How to share passwords
Once a password has been created, it can be shared through the Plume Home app.
1. Open the Network page.
2. Open the Passwords page.
3. Select the access type: Home, Guest, or Internet-only
4. Select the password to share
5. Select an option to share. Scanning a QR Code or the Share a link option.
6. Share with an app. The Share a link option opens a menu with all the apps on the device that can be used to share a URL. Tapping on an app will send a time-limited (24h) link through that app that shares the password.
Device Management
Where is the Main Menu?
You’ll find the main menu bar at the bottom of most screens—it’s your quick-access hub for navigating the app. While it may disappear during certain tasks (like viewing your network topology or adjusting some settings), it’s always ready to get you back to the essentials.
Here’s what each button in the main menu does:
-
Home
Your app dashboard is where you’ll see key updates and quick actions pulled from across the app. Think of it as your control center, with shortcuts to get things done faster. -
Profiles
You can manage both People and Group profiles here. Profiles let you apply features like Focus or Traffic Boost to a group of devices without setting them individually—super handy for families and shared tech. -
Network
This is where all your nodes and connected devices live. You can view them, manage them, and access specific actions for each one—right from this page. -
Settings
All your essential network settings in one place, including router options, default security and privacy settings, and app notifications. If it affects the whole network, you’ll find it here.
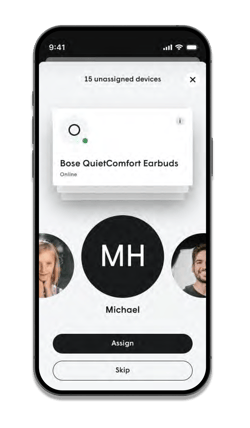
How to manage your devices?
1. Open the Network or Profiles tab. Unassigned devices will also be listed on the Home dashboard.
2. Select a device from the device details section of the Profile or Network tabs. If assigning from the home dashboard, drag a device card to a selected profile.
3. Tap on "Assign to a Profile" from the device details in the Network screen. Or, click the arrowed people icon to add or reassign a device from Profiles.
4. Swipe or tap the "Skip" option to toggle through available device cards and then drag the chose device into the Profile tile or tap "Assign".
5. To edit or unassign a device, tap on the ellipsis menu (. . .) in the Network screen or Profiles screens once a device is selected. This is where you can also edit a device name.
Creating a Person Profile
Creating Profiles for the people using the network is an important first step, allowing you to monitor and manage network access. A profile is automatically created for the user whose information is provided during account creation.
1. Select the Profiles Page. Open the profiles page by tapping on the second button in the main menu bar.
2. Select the People tab.
3. Tap the "+" button.
4. Add a profile picture. (Optional step)
5. Select picture source
6. Select content filtering level. (All devices on this profile will have the same filtering level.)
6. Content filtering levels: Restricted, Moderate, Light, Child, or None.
7. Enter the user's name.
8. Invite the user to the app (Optional step)
9. Click Add to create the profile.
How do I assign a primary device?
Each person/profile can have a primary device assigned. That primary device's connections and disconnection from the network determine whether the person is home or away.
(Hint: You should always choose a primary device a person is not likely to leave home without and that will always stay powered, like a Smart Watch or phones.)
1. Open the Profiles page
2. Select the person profile
3. Assign a primary device
4. Swipe to the device and select a device.
How do I remove a profile?
1. Go to Profiles page
2. Open the options menu by tapping on the profile picture. The menu will appear at the bottom of the screen.
3. Select Remove Profile.
4. Confirm the removal.
How do I schedule a Focus?
1. A Focus can be created from the home dashboard if there are none active, or from within the Profiles page.
2. To create a new Focus, start by pressing the "+" button on the Profiles page.
3. Start by naming your Focus and select the devices or Profiles that will be included, then tap the "Next" button.
4. On the following screen, select either "All" or custom tile options. "All" will disable internet access entirely, while custom options allow specific app categories (e.g. Social networking) or individual applications (e.g. Facebook) to be paused.
5. If proceeding with a custom Focus, select the desired categories or individual apps, then press "Next" to proceed.
6. You must now schedule your Focus to be one-time, recurring, or indefinite. Select a start and end date for one-time or recurring Focuses. An indefinite Focus will remain active until you deactivate it.
7. Select the applicable days of the week for a one-time or recurring Focus. Once completed, tap "Create" and the Focus will be activated based on these settings.
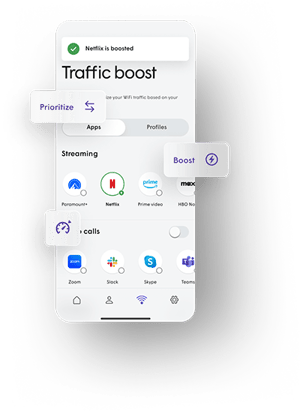
How to prioritize a Traffic or Home Security Boost?
Traffic Boost
1. Tap the "Traffic Boost" icon from the Home dashboard or under the Network page.
2. Tap the "Apps" header tile to boost specific categories or individual apps, or select Profiles to boost specific profiles and their assigned devices. It is also possible to prioritize a single device.
3. Select a time limit or 3 hours, 6 hours, or until the end of the day. You will see this change reflected in the Traffic Boost title cards in the Home dashboard and Network pages.
Home Security Boost
1. From the Settings page, tap the "Security" tile.
2. Enable the toggle for Home Security Boost, which will activate once all primary assigned devices have left the home.
How do I manage existing Focuses?
A Focus can be disabled, edited, duplicated, or deleted once created.
1. Go to the Profiles page.
2. Click the clock in the upper right-hand corner.
3. Sort Focuses. In the View all page for Focuses, you can sort the Focuses using the tabs. The options available are: All, Active, Upcoming, and Disabled.
4. Open the Focus options.
5. Select the management option. The options available are: Disable Focus, Edit Focus, Duplicate Focus, and Delete Focus. Deleting a Focus removes it from the list. Tap an option to continue.
- Disabled Focuses- Use the Option Menu and select Enable Focus.
- Edit Focus - When selected, proceed through the Focus creation to make any changes needed.
- Duplicate - will create an identical Focus with a blank name. Proceed with the Focus creation.
How to Manage Passwords
The number of passwords you can have on your home network depends on the type of encryption you are using. A WPA2 network can have up to 30 passwords, with three different access types. A WPA3 network can only have one password that will always have Home access.
Enabling Multiple Passwords:
1. Open the Settings Page
The settings page is opened by tapping the gear icon in the main menu bar.
2. Open the Network settings page
Tap on the Network tile to proceed.
3. Open the WiFi security page
The WiFi security menu option shows the currently enabled networks. Tap the list entry to open the page.
4. Enable WPA2
If WPA3 is available, it will be switched to enable both the WPA2 and WPA3 networks. Tap the WPA2 switch to enable multiple passwords.
5. Add additional passwords
Once WPA2 is enabled use the Add passwords flow to create additional passwords.
Adding new Home Password (WPA2)
Devices connecting with a Home password will be able to connect to devices connecting with any Home password.
A WPA2 network must be enable to add a new Home password. (See above)
1. Open the Network Page
The Network page is the third icon in the bottom menu bar.
2. Open the Passwords page
If a WAP3 network is also enabled you will need to swipe to find the Passwords tile. Top on it to open the Passwords page. The Passwords (plural) tile is for WPA2.
3. Select the Home tab
4. Tap the new password button
5. Enter the password
6. Add the password
A pop-up notification will confirm the new password has been created.
Speed Tests
How do I view my network speeds with the Home App
ISP Speed tests
How to run an ISP Speed Test
Network Security
How do I enable Online Defense?
Online defense provides network-level protection for devices by preventing them from connecting to known malicious domains and IP addresses. For online defense to be enabled, devices must be assigned to a profile.
1. Open the Settings page. The Settings icon is a gear on the right side of the main menu bar.
2. Click Security to open security settings.
3. Open the Online Defense selection options.
4. Select any Profile you would like to enable Online Defense.
5. Save any changes. Tap the Save button to apply any changes.
How do I enable Advanced loT Protection?
Advanced loT Protection provides network level protection for loT devices by preventing them from connecting to unknown domains and IP addresses not normally accessed. Devices must be assigned to a profile for Advanced loT Protection to be enabled.
1. Open the Settings page.
2. Open Security settings
3. Open the Advanced loT selection options.
4. Select Profiles
5. Save any changes.
How do I remove devices from quarantine?
When a device is quarantined by Advanced IoT Protection, it will be moved to Internet-only access.
1. Open the Network Page
2. When a device is quarantined, it will be shown in the Pending activity section. Top of the Quarantined device tile.
3. Tap the Unquarantine button at the bottom of the screen.
How do I enable Adblocking?
Adblocking provides an improved browsing experience for devices by preventing them from connecting to known ad servers.
1. Open the Settings page.
2. Open Security settings.
3. Tap the Adblocking menu option.
4. Select Profiles.
5. Save changes.
How do I add domains and IP addresses to Block?
Any domain or IP addresses that are not blocked can be added to the Blocked list manually.
1. Open the Network page.
2. Tap on Network Security.
3. Open the options menu ". . ." top right corner of the screen.
4. Select "Approved & blocked list"
5. Switch to Blocked
6. Open the filters
7. Select a Person profile or a Group that will have the block applied. Tap the circle to select at least one.
8. Click apply.
9. Tap the "+" button in the top right corner to add a new block.
10. Select type of block: Web, IPv4 address, or IPv6 address.
11. Enter the address
12. Tap the Block button.
How do I remove a site from the Blocked list?
Once added to the Blocked list, a website or IP address can be removed from the list.
1. Go to Network page.
2. Click on Network Security.
3. Open the options menu ". . ." found in the top right corner.
4. Select Approved & blocked list.
5. Select the domain or IP address you want to remove.
6. Select Delete item to be removed from the list.
How do I view blocked Security events?
1. Open the Network tab.
2. Click Network security.
3. View events. Filters include 24 hours, 7 days, and 30 days.
4. View Filters by Event Type.
5. Filter events by profile or device.
How do I change the remote access protection settings?
Remote access protection can only be enabled or disabled for the entire network.
1. Go to the Settings page.
2. Tap on Security.
3. Open Remote Access.
4. Select the settings you want to apply: Block all, Block only high risk, and Disable.
How do I turn off Data access?
Turning off Data access will turn on Privacy mode. Data access can only be turned off at a network level, not a profile or single device.
1. Open the Settings page.
2. Open Privacy settings.
3. Turn off Data Access.
4. Confirm on the Pop-up screen.
You will see a Data access off notification at the top of multiple pages, like Network and Security.
Equipment
Troubleshooting your internet
If you’re experiencing issues with your internet connection, there are a few things you can check:
- Check for outages – If this is a planned outage, you should receive an email with that information.
- Turn off your ONT device, unplug it from the wall for 30 seconds, and reconnect
- If the issue persists, please call tech support at 833.717.4448 and choose the option for Technical Support. Our support team is available 24/7.
- While we understand you may want to disconnect the cable, we ask that you leave that to our team of experts as fiber cables are very thin and this could permanently damage the equipment and cause additional downtime.
What are the additional ports on the back of my ONT/modem for?
Two of the additional ports on the back of your ONT device are available for your use. The final port is reserved for additional services related to the device, such as IP TV and IP Voice. A gigabit Ethernet switch can be used to expand the number of usable ports.
Can I use my existing equipment if I upgrade to 2 Gig or 5 Gig speeds?
Equipment before May 2025: No, 2 Gig and 5 Gig speeds will require a new Optical Network Terminal (ONT). A 10 Gig port and a 4x4 WiFi instead of 2x2 are required in order to allow for the total number of channels, which in turn provides more bandwidth.
Exception, if you have our new Zyxel 7710 Gateway, you will not need to upgrade your equipment.
Will my new ONT needed for 2 Gig or 5 Gig still house my WiFi router?
Yes, WiFi is enabled on the RightFiber ONT by default. If a customer wishes to use their own WiFi, please let our tech support know so we can disable the RightFiber WiFi functionality.